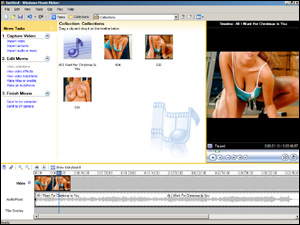
 Pic: Famed videophile Dr. Mercury utilizes over a decade's worth of clinical expertise as he carefully crafts together today's serious piece of work.
If you happened to catch my Dixie Lily video post a while back, whoever put the clip together did a superb job of matching up the accompanying pics with the song's lyrics.
Using the free Windows program 'Movie Maker', this is fairly easy to do and obviously (glancing at pic) a barrel of fun. As long as you've got the song, the rest is up to Google Images.
For the long, arduous process (1. Load pic 2. Drag pic to timeline), we shall dip below the fold.
To download this puppy, go here. It'll say "for Vista", but it works fine on Win7 (and probably 8). This is a slightly older version than what's available now. These geniuses took away the whole 'timeline' area which, naturally, is what makes it so easy and fun to work with. The new one has a few more bells & whistles, but this version will have all the fancy stuff you'd normally use.
Presuming you already have the song, the first step is to figure out how many pictures you'll need. You might dig up the lyrics and paste them into a Notepad file, then put a mark or space where the pic changes. As you get the pics organized, change their names to something like "pic01", "pic02", etc, so they'll line up correctly with the song.
Here's the general routine:
1. Fire up the program. Click on 'Import audio or music' and load the song. Grab the song's big icon with the mouse and d-r-a-g it down to the 'Audio/Music' part of the timeline. Grab it again and make sure it's pushed all the way to the left.
2. Click on 'Import pictures' and load the pics. You can do a batch load by clicking on the first pic, holding down the Shift key, then clicking on the last pic.
The pics should be imported, timed and transitioned one by one. Grab pic01 with the mouse and d-r-a-g it down to the 'Video' area of the timeline. Push it over to the left.
3. You can place the 'start play' marker wherever you want by clicking on the top bar of the timeline. Hit the Space Bar or click on the little 'Play' arrow to start the player. (Usually, hitting the Space Bar will stop and start the player but, oddly, not always.)
When it gets to the moment you want to switch to pic02, hit the Space Bar or click the button to stop. You can move around the timeline slowly by holding down the Alt key while using the left and right arrow keys.
This next part's a little funky, but hey, the program's free.
4. Note where the little blue box of the timeline marker is in the top box of the timeline. If it isn't already, click on the pic and d-r-a-g the right side past that point a ways. The marker will have moved, so play it again and stop it at the right spot. Note carefully where the little blue box is, click on the pic and d-r-a-g the right side of the pic back to the spot. It'll jerk in small increments but you'll be able to get it close.
Put the timeline marker just before the break and test the clip. If the pic ends a bit too soon or too late, grab it on the right side and adjust it, watching the numbers in the pop-out box. If you're trying to get it more exact, click the 'Zoom' button a few times.
5. Now drag pic02 down to the timeline. This time pull it to the right to make sure it's not overlapping pic01. Again, pull the right side out a ways (past the end point), then play the song, stop it at the right spot, note it carefully, grab the pic and move the right side back to the spot. Fine-tune as necessary.
Transitions
These have to be imported along with each pic. They make the pics overlap a bit, so if you get all the pics perfect then add the transitions later, it'll shorten every clip and mess up all of the timings.
Transitions range anywhere from a soft fade between pics to some wild geometric bizarreness. The default time is in the Options. If you want an extra-long transition between two pics, grab the second pic and move it to the left so it overlaps the previous pic.
6. Select 'Video Transitions' from the drop-down menu at the top of the screen or click the sidebar entry. Grab the transition you want and d-r-a-g it down to the 'Transition' area (which might have just opened for the first time) in the timeline. When you get it near to between two pics, the bar will change to dark blue, at which point you can release it. Scoot the slider back a bit and test it out.
Repeat steps 5 through 6 as necessary.
Note: You can give yourself a bit more room on the timeline by grabbing the horizontal yellow bar and raising it.
Titles & Overlays
If you want a title page at the beginning or end, or want to overlay some text over a pic for X amount of seconds, click on 'Make titles or credits' and click on the desired result. You adjust the time of title pages with the right side like a pic; the overlays are adjusted down in the 'Title Overlay' area.
Note that a title page acts like 'pic00', so it should be put in first.
Video Effects
The 'Video Effects' affect the pic they're placed on. Some of them, like 'Blur' and 'Pixelate', don't have much use, but the fade-in and fade-out to black are a nice touch. If you saw that video I mentioned at the start of the post, he added the 'Sepia Tone' to each pic to give them that old-timey look.
Drag the desired effect down to the pic and drop it. This is a little awkward (just keep reminding yourself that the program's free), but in order to remove an effect, you have to right-click on the pic, open 'Video Effects' and 'Remove' the unwanted effect.
Saving The File
When your masterpiece is ready, click 'Save to my computer':
— Put in a name for it and browse to the save location.
— Open the 'Other settings' drop-down menu and select 'Video for local playback (2.1 Mbps)'.
— Let 'er roll.
Uses
If this is for personal use or you're going to post it to a site like YouTube, you're ready to go.
If you want to stream it from your own site, you'll want to convert to the FLV format first. There are a number of good free converters around.
Any questions, corrections or additions, give a holler in the comments like usual.


 Pic: Famed videophile Dr. Mercury utilizes over a decade's worth of clinical expertise as he carefully crafts together today's serious piece of work.