 One of the best things about writing program reviews is that sometimes someone springs out of the woodwork with a better suggestion. A while back I wrote a review on 'Start Menu 7', a replacement Start Menu for Windows 7. But while it works perfectly, it still costs twenty clams.
Enter 'Classic Start Menu' (where do they dream up these wild and crazy names?), a free replacement that mimics the old style menu perfectly. It's also quite configurable so you can get rid on any unwanted Start Menu entries, like "Help & Support", the ultra-worthless 'Search' box, and arrange the columns and icons to just the right size.
But the main thing is that the menus auto-expand — like in the old days — so there's no unnecessary clicking. If I want to access 'Process Explorer' inside of my 'Tools' Start Menu folder, that's 5 mouse clicks with the stock Start Menu, 2 with Classic.
Additional info (and some other program suggestions for Win7) is below the fold.
The download link is here. It's been a while since I've installed it, but I think there are some boxes to check at some point.
Setup
Look in the Start Menu for the 'Classic Start Menu' entry. In the box that pops open, click on 'All Settings' at the bottom.
To size everything down, choose 'Small Icons' on the 'Skin' panel. To get rid of the 'Windows' logo running down alongside the menu, uncheck 'Caption'.
You'll want to glance over the 'Special Items' panel and uncheck anything you don't want. For 'Shutdown', I think 'menu' is easier to use than 'link'.
If you want to get rid of the pesky 'Location' box that pops up when hovering over an entry, set both 'Infotip' settings to '0,0' on the 'General Behavior' panel. I did the same for 'Menu delay' (just one zero) and unchecked 'Delay loading of icons'.
As with the XP Start Menu, right-clicking on the 'Start' icon, 'Open', opens up the 'Start Menu' folder in 'Users'. In there, I keep my main category folders ('Audio', 'Games', 'Graphics', etc) and a shortcut icon to the 'Start Menu' folder in 'ProgramData' for easy organizing. You can also use the 'Open All Users' entry from the 'Start' button to access the second group.
Organizing The Start Menu
What makes this confusing is that there are two places where Windows puts the icons for the Start Menu. You might have noticed that many programs ask during the install if you just want the program accessible to you, or to "all users". That's why there are two areas.
What makes it additionally confusing is that, rather than putting the 'all users' icons in the 'All Users' folder in 'Users', it stuffs them deep in the 'ProgramData' folder.
Do this:
— Right-click on the 'Start' button and select 'Open'. That opens the Start Menu folder in the 'Users' folder. Shove the folder to the side.
— Again right-click the 'Start' button and this time select 'Open All Users'. You'll see a 'Programs' folder. Make a shortcut icon of it, rename it to something like "Start 2" or "Other Start" and then d-r-a-g it over to the first Start Menu folder and drop it inside the 'Programs' folder. Now, when you open the 'Programs' folder to access any fresh entries, you'll have easy access to the second Start Menu folder.
On the subject, the actual program icon will usually be in the second Start Menu folder. There will often be a folder for the new program in the first Start Menu folder, but it'll be empty.
— In the first Start Menu folder, make folders for your main categories, like "Audio", "Games", "Graphics", "Info", "Music", "Tools", whatever. You can also make sub-folders.
— Roll up your shirt sleeves, freshen up the coffee, take a big swig off the nearest bottle of Jack Daniels and then open up every program folder in both Start Menu folders and drag the actual programs to their new homes. Then delete the original program folders to tidy things up. There will also be a handful of single program icons floating around.
— Now take a small twig or rolled-up piece of rawhide, clench it between your teeth to ward off the pain, then proceed to open all of your category folders and rename every icon to just the program name, eliminating any company name or version number. "Microsoft Corporation Digital Word Processing Algorithmic Unit Version 103.34452b" would become "MS Word", for example.
Here's what mine looks like:
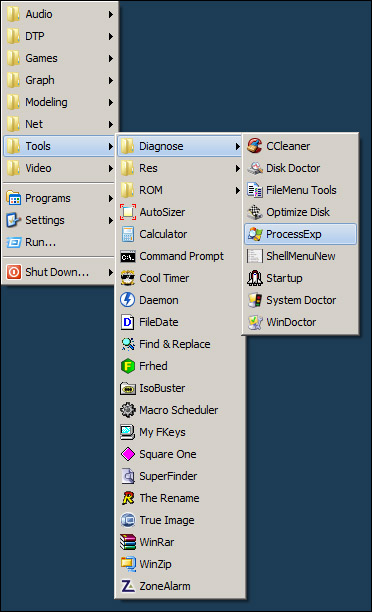
('DTP' stands for 'Desktop Publishing', like word processors, dictionaries, etc, and I keep the Task Bar at the top of the screen as any good ex-Amiga or Apple user should. The menus are, after all, called drop-down menus, not drop-up menus, right?)
As noted, you can also create sub-folders. In this case, I put my main tools in the main 'Tools' folder, fix-it & tweak tools in 'Diagnose', some batch files to change the screen's resolution for testing purposes in 'Res', and a handful of disc-related tools in 'ROM'. So do whatever fits your system.
Other Win7 Proggies
— To organize/eliminate (most of) the entries in the right-mouse-button 'context' menu, try FileMenu Tools. Look through the 'Commands of other applications' tab, uncheck things, hit the 'Save' button, test it out. Another one to try is ShellExView.
— To organize/eliminate (most of) the entries in the 'New' menu, try ShellMenuNew.
— To replace the now-worthless Search feature, try Super Finder. Be sure to do the tweaks on the page after you install it.
— If you're still looking for a replacement for the fabled Outlook Express, try Thunderbird. It handles multiple identities even better than OE did.
— For the most kick-ass Win7 setup page you've ever seen, try this.


Now that I'm actually using Windows 7, I'll have to take back all of those cruel, nasty, horrid things I said about it in my initial review. I hereby take them all back. So, to sum up: — If you're an average user who just grabs the ol' email and
Tracked: May 07, 10:15
Every now and then I like to run this post up the flagpole. I can't guarantee all of these will work on every Windows operating system, but most should. If I know it's only for one OS, I'll point it out. Programs AutoSizer — This has two
Tracked: May 15, 10:00