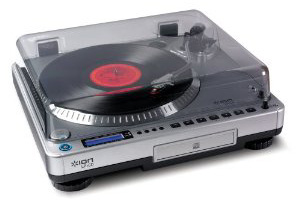
 The Automatic Method
Pic is from here.
Here's the problem and, personally, I found it insurmountable:
In their 30 years of existence, you have never heard a CD with clicks, scratches and pops on it. Never.
Hell, some of you have never heard any music with scratches and clicks and pops — simply because you grew up with CD's from the get-go.
So, call it "cultural conditioning", call it "high expectations", call it "being spoiled rotten", but there's just something about hearing scratches and clicks on a CD that's extremely off-putting. It just doesn't work. You expect it with a vinyl record, but not from a digital disc.
When I put my albums on CD a few years ago, I first simply (1) digitized the songs coming off the record player, then (2) burned them straight to CD.
If I were going to list the more surreal moments in my life, putting a CD in the player and listening to it go scritch-scritch-scritch as it started to play would go somewhere on the list. It would be like starting a DVD movie and having the "horizontal hold" start rolling the screen like a 1965 Sylvania TV. I just found the whole thing too bizarre to deal with so I did it the manual way and got rid of the noise.
On the other hand, it might not bother you, and you might even like it, feeling it gives the discs that true 'air of authenticity'. If that be the case, then the above machine looks pretty hot. Read the first review, down near the bottom of the page. I like the way you can store songs on the unit first and hear how they'll sound before actually burning the disc. And the guy claims to be something of a stereo buff and states that the quality of the music met his criteria, so I'd lend that some credence. People usually don't claim to be audiophiles or videophiles unless they actually are, and, being both, I can claim without reservation that we're a scrupulously picky bunch and rarely hesitate to tell it exactly like it is. If the unit was somehow augmenting the sound (shrill highs, weak midrange, booming bottom end, etc), he would have noted it.
Then take a stiff shot of Jack Daniels for courage and read the second review, a happy reminder of the perils of online shopping.
If I were going to go this route, I'd hunt down some web site reviews on the available units and read every customer review I could find. There are probably web forums devoted to the love, care and playing of vinyl records and they'll have threads devoted to the subject. The main thing is that the company have a 'no questions asked' return policy in case you end up not liking the snap, crackle and pop on your little creations and decide to do it manually so you can get rid of it.
As a small side note, if the machine claims to have a "noise filter", be forewarned. This is a lot more difficult that it appears. Read the relevant areas in the next section.
The Manual Method
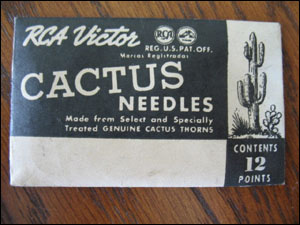
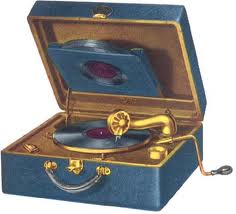 Pic: Disdaining cactus needles as "old-fashioned", Doc inserts a brand new steel needle into his gramophone, ready for the big event!
Doing the conversion manually is obviously more laborious, but at least you'll get rid of the hiss, clicks & pops. It involves using your own gramophone phonograph, your computer and some fancy software.
It's basically a 4-step process:
1. You fire up the software, play the first side of the album and record it
2. You run the recording through a 'noise filter' in the program
3. You save each song as a separate file so the CD will view them as independent songs
Repeat the above with side two of the album.
4. Burn the songs to CD
Hardware
If you don't own a phonograph, I suppose the first step would be to ask around. Someone should have one stuck in the attic. If not, try a pawn shop. You don't need a high-quality one, just a 'decent' one will do. As long as it has anti-skating, it should be fine. Sound quality-wise, more will depend on the condition of the stylus than the actual unit.
If you don't have a stereo set with a 'Phono In', you'll need a small $30 pre-amp to amplify the phonograph's signal for the computer, available at Radio Shack. They have a cheaper one but this one has 'regulated power', which you'll want for recording. A unit without regulated power will probably create a small hum or buzz in the background.
You'll also need stereo cables to go from the stereo or pre-amp's 'Line Out' jacks to a stereo Y-adapter for the 'pin' jack on your computer.
If you end up with a background hum anyway, you probably need a 'ground loop isolator', available at the Shack for $17. Don't forget to pick up the double-female connectors since the unit has male jacks on both ends.
Gettin' Ready
 Remember, you're only going to do this once, so you'll want the recording to be as good as possible. This involves a few steps:
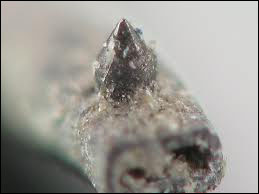
— You'll obviously want a decent brand of cartridge and, more importantly, a stylus in relatively good shape. The proper test of a stylus is to examine it closely with a 30X jeweler's loupe or a lightscope and make sure it's conical and there aren't any flat spots worn on the sides.
If it's in bad shape, note that you don't have to replace the whole cartridge, just the stylus. Most of them just pull right off the cartridge head.
— Gently clean the stylus tip with a Q-tip dipped in isopropyl alcohol before each playing. You can see the little bits of accumulating vinyl on the tip in the pic.
— Check the tracking weight and anti-skating of the tone arm. If you're clueless about both, don't worry about it. Getting both exactly correct has more to do with long-term wear of the record than how it sounds on one play-through.
The weight of the tone arm head should feel about as heavy as a penny. Fairly light, in other words. It's usually adjusted by moving the back end of the tone arm. Some of them are calibrated. Try a gram or gram and a half if so. You can look up the cartridge on the web and find out it's ideal tracking weight if you're so inclined.
'Skating' is the tendency for the motion of the rotating disc to pull the tone arm toward its center, thereby increasing pressure on the inner groove, distorting the sound and wearing it out prematurely. Anti-skating is a reverse force on the tone arm to fight it. With the tone arm near the cradle, gently lob it upward and the anti-skating should just barely pull it backwards. The adjustment for it is usually on the back of the tone arm, usually a set screw of some type. If you can't find it, look up the phonograph on the web and someone should have an instruction manual posted, or just type in "how adjust anti-skating on (player name and model)" and look for a forum reply.
— Clean the albums with a quality cleaner like Discwasher. While it's a tough call (depending on the condition of your stylus), this is probably the most important step of them all. This is especially true if you haven't played the albums in, oh, a few decades or so, as there will be scads of vinyl 'sheddings' clogging up the grooves. Give them a real good scrub with the brush, and keep the brush, itself, clean. If you're burning a lot of albums, buy an extra bottle of cleaner.
— If the album has a skip, take a straight pin and force it along the groove so it opens up the 'flap' of vinyl that's causing the skip. If that fails, try doubling the weight of the stylus for just that one song by putting a penny or two on the head of the tone arm.
Hook-Up
Somewhere on the back of the computer you should see three round holes, probably color-coded. You might also have corresponding color-coded jacks on the front. You probably want the orange-pinkish one, the 'Line In'. If all you have are symbols, it'll be the nondescript one, like maybe a small lightning bolt. The microphone input usually has a pic of an old-time microphone and the headphone jack usually shows a small set of headphones.
Software
I first tried the noise filters in Goldwave, Cool Edit Pro and an old version of Sound Forge (all three top-shelf commercial programs), and while the results were 'okay', they weren't particularly impressive. Then I tried an evaluation copy of the latest Sound Forge and wow, they really nailed it. The biggest problem is getting rid of the background hiss without losing any of the highs, but they managed to pull it off.
At $375 on the home site, it's much too pricey, and you don't need the latest version. The big update was at version 9, the one I used, and it looks like it can be found for fairly cheap.
On the free end, there are a number of nice editors around, like Audacity, but whether or not they have noise filters — and how well they work — is up to your discerning ears.
Recording
Since I don't know which audio editor you're using, I can't give you specific instructions, but generic ones should suffice.
On most programs, there's a red 'Record' button displayed somewhere. Clicking on it will open a dialogue box so you can select the exact settings. The usual is 44,100, 16-bit, Stereo. There'll be another button to start the recording process.
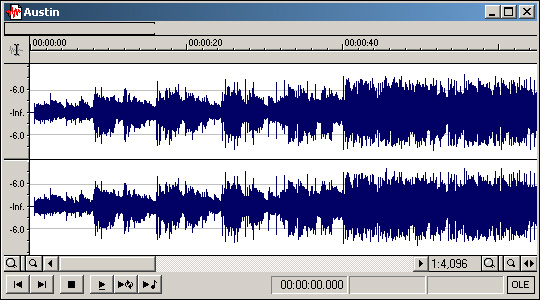
The first time through, record 10 seconds of a loud passage on the album and stop the process. You need to determine the recording level. Too soft, and you'll add background noise when you later raise the volume up to a normal level. Too loud, and the louder notes will 'clip' (have their peaks cut off) and sound distorted on playback.
Correctly, the highest peaks should almost touch the top of the program, but anywhere above the halfway point will be fine. If the very, very tips of the peaks get cut off, that's okay. We just don't want it way too high or way too low. It'll look something like this, albeit full-screen:
Adjusting the recording level is done via Windows:
— Win XP: go to Start Menu, Programs, Accessories, Entertainment, open Volume Control. First, make sure all of the playback levels are all the way up. Then go to 'Options', 'Properties', select 'Line in/Mic in' at the top and check the 'Recording' gadget. Click OK and there are your recording levels.
— Vista & Win 7: go to Control Panel, 'Sound', 'Recording' tab. Select 'Line In', 'Properties', 'Levels' tab. That's your main level control.
Once you get the recording level correct, fire up the album and let 'er rip. Don't worry about any extra time at the beginning or end; you'll snip that out later.
If it skips at some point, stop and correct the problem with a straight pin, then re-start the recording from that song. You're going to be snipping out the individual songs, anyway, so there's no reason to start all over.
The Noise Filter
Any decent audio editor will have a variety of pre-set noise filters. You'll be testing a real short clip so it won't take long, and the better programs have a 'Preview' feature right on the filters panel. (They usually start the preview from wherever the editing line is on the graph or whatever area is highlighted, up to a certain number of seconds)
There are two things you're testing for:
1. Crackles and pops — Take a few seconds from a quiet spot in a song where there are noticeable clicks and maybe a nice fat POP. Run the filters and see how they handle them. The clicks, while still slightly audible, should relegate themselves to mere background noise.
2. Hiss vs. highs — It would be easy to get rid of the background hiss just by filtering it out by frequency, but then you'd cut out the highs in the song. The trick is to keep the highs but lose the hiss — and, as evidenced by the three commercial programs mentioned above failing Dr. Mercury's critical ear, it's easier said than done. Highlight a few seconds of some high guitar riffs, organ notes and/or choral voices. Run it through the filters and make sure nothing — or as little as possible — gets lost. If you're using a program other than Sound Forge 9 or 10, you'll probably notice a tiny loss of highs, so use the pre-set filter (or try making your own) that sounds the best.
For those of you who picked up Sound Forge, I don't remember the exact setting, but it was the first one on the panel I tried. A very impressive upgrade.
After you decide upon a filter, run it on the entire file.
Save the file as "side1" or something, in PCM WAV format and the same specs as above, 44,100, 16-bit, Stereo. This is just a temp master file until we get things sliced up.
Saving The Songs
You'll want to save each song individually so the CD player will view them independently and allow pre-programming and 'Skip' features and such to work correctly.
Note 1: Almost all audio CD burning programs put a 2- or 3-second space between the songs (sometimes adjustable in the Options), so do your cuts right before & after the songs.
Note 2: The program I recommend below has an adjustable delay, so you might consider giving yourself a half a second on either side of the song when cutting it out, just to make sure you don't snip something off, then reduce the program from a 2-second delay to 1 second.
The process for saving just one song from the main file depends upon the program. Some will nicely let you 'Save highlighted area', in which case you'd merely highlight the song and save the file.
Others have you first copy the song to memory (highlighting it and hitting Ctrl-C), then open a 'new' project and paste it in (with Ctrl-V), then save that. If the new project is a set length of time, make it for longer than the song, then clip off the end before saving.
In lieu of those features, you could just highlight everything up to the song, hit the 'Delete' key, then highlight everything after the song and delete it, then save just the song. Then you'd re-load the master file and do the same thing to the next song.
Burning
Most decent 'jukebox' programs have a burning feature, or you can use the Windows program, Media Player, or a downloaded freebie. The one thing to note is that audio CD's aren't burned like regular data discs; they actually require a special process, hence the need for some kind of jukebox program rather than just a regular basic disc-burning program. The better burning programs will have an 'Audio CD' feature.
Be sure to play the first burned disc in the player(s) it's intended for. There are a handful of settings for the burn process and your player(s) may not like the default settings.
Burning With Windows Media Player
I presume it's a bug, but on my Windows XP and Vista systems, Media Player version 11 only displays the true time of the songs for about a quarter of them. Most say somewhere around 20 to 30 seconds. They play fine, but for burning purposes we often want to have some kind of idea how long the songs are.
So, for XP and Vista users, I'll suggest the freebie program down below. For Win 7 users, do this:
— Put a blank CD in the burner
— Open Media Player. Click on 'Music'. Click 'Organize' at the top-left, select 'Manage libraries', 'Music'
— Click 'Add', browse to your music folder, OK
— Click on 'Title' at the top of the viewing window so they'll organize correctly
— Click on 'Burn' on the upper-right
— Either drag the entries over to the window on the right or right-click on them and 'Add to...', 'Burn list'
— Click 'Start burn' on the upper-left of the burn window to burn the disc
Ashampoo
This is a great program for a freebie. Download it here and install it. If for some reason you have a problem with it, try CDBurnerXP.
To burn an audio CD:
— Put a blank CD in the burner
— Open Ashampoo. The first time through, uncheck the two 'news' boxes.
— On the main menu, go to 'Burn or Rip Music', 'Create an Audio CD'
— Click on 'Add' and add the tunes
— You can arrange the order by either dragging them with the mouse or using the sidebar
— Click on 'Options'. You'll probably want the first feature, but turn it off if the balance doesn't sound right. (That is, the gap between soft songs and loud songs is too close; soft songs aren't soft enough and loud songs aren't loud enough)
— The bar down below will show you how much time is left on the disc. When you're right up to the mark, click the 'Next' button.
— Click on 'Change Options' and note:
1. If the disc doesn't play in your player(s), the "Disc At Once' option is the first thing to uncheck. Second up would be to slow the burn speed way down. Third up would be to try a different brand of blank if you've never burned (and successfully played) your current brand before.
2. Copying the data to the hard drive first is usually recommended. These files aren't very big and it won't take that long. It should be on by default, as most burning programs are.
— Click on 'Write CD' to burn the disc
Summation
As I said, those poor old records are disintegrating as we speak. If you're ever going to do it, do it now.


 Bird Dog raised the question of transferring vinyl record albums to CD a while back, and an excellent question it is. While most old albums have been put on disc, certainly not all have. And the impracticality of keeping a record player hanging around is obvious — and that's assuming that slick new 'home entertainment center' you just bought even has a 'Phono In' jack to begin with.
 The Automatic Method
  Pic: Disdaining cactus needles as "old-fashioned", Doc inserts a brand new steel needle into his gramophone, ready for the big event!
  Remember, you're only going to do this once, so you'll want the recording to be as good as possible. This involves a few steps:
Do you know anyone who uses a computer? My guess is that you know a very special someone who uses a computer. Someone who's using it right now, in fact, and you'd like to give that special someone a really nice computer gift for Christmas. A
Tracked: Dec 12, 09:45
Do you know anyone who uses a computer? My guess is that you know a very special someone who uses a computer. Someone who's using it right now, in fact, and you'd like to give that special someone a really nice computer gift for Christmas. An
Tracked: Dec 14, 12:01